What is BME680
The BME680 is a pressure, temperature, humidity and air quality sensor developed by Bosch Sensortec. It provides precise measurements of these parameters and has been used in various fields such as meteorology, industrial applications and IoT (Internet of Things). The BMP680 can be used to measure ambient pressure as well as to develop various types of devices that require precise measurements of atmospheric conditions. Today we will see how we can make a weather station with it in combination with an ESP32 board. More information about the sensor can be found here. The sensor we will be using is this and the ESP32 board is the NodeMCU-32S – this (micro usb version).
What is the plan?
BME680 supports I2C and SPI communication. The plan is to connect the sensor to the ESP32 board and read the measurements at a specified interval. After reading them let’s display them on the serial console and understand the measurements.
What is I2C
I2C (Inter-Integrated Circuit) is a communication protocol that is used to connect various components in electronic devices. It allows these components to exchange data and commands with each other over a bi-directional serial link using two wires: serial data (SDA) and serial clock (SCL).
I2C is very popular for the connection of microcontrollers, sensors, actuators and other peripherals in systems where communication between different components is required. One of the advantages of I2C is that it allows multiple devices to be connected to the same line, using different addresses to identify each one. This makes I2C suitable for building complex systems with multiple peripherals.
Connect
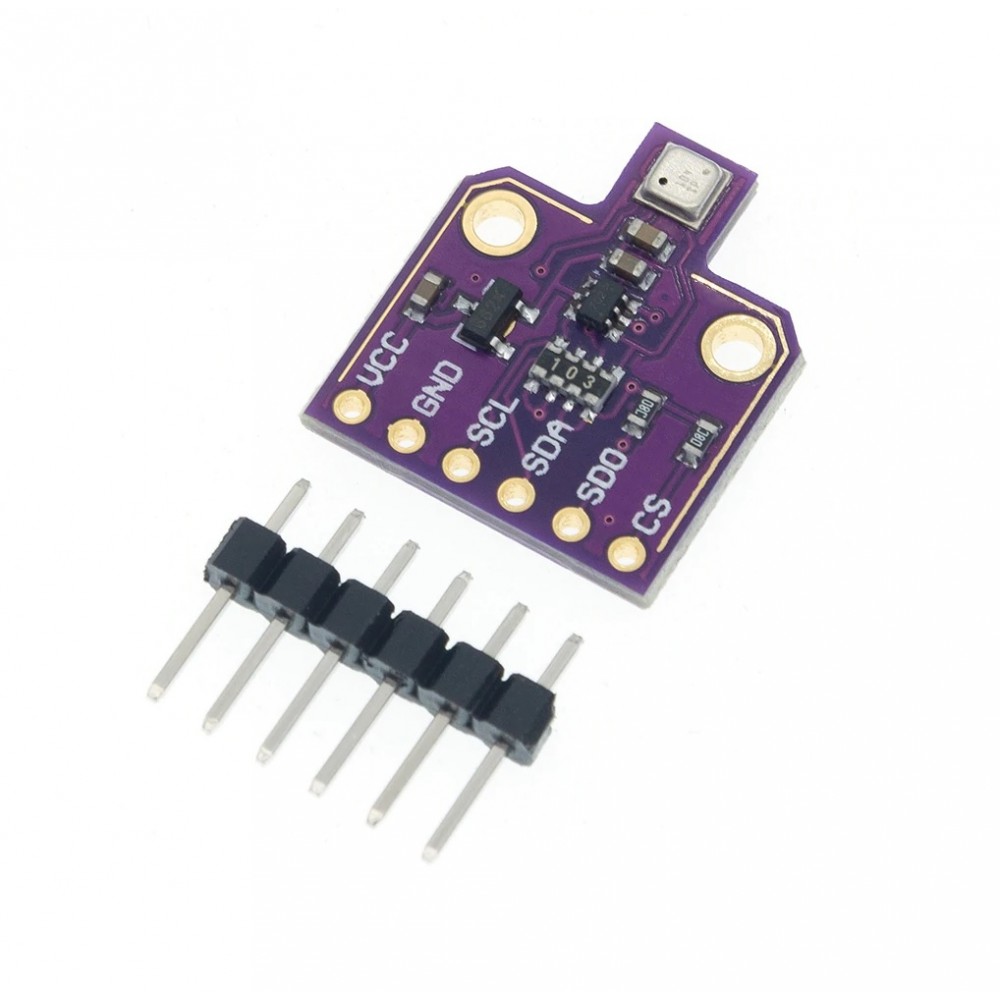
Let’s check the sensor and find the SDA and SCL pins. Usually they are written on the sensor. As we can see from the picture and the writing on the sensor, these are the 3rd and 4th pins from left to right.
Now we need to find those pins on the ESP32 board as well. We can see this in the description of the specific board or from its pin diagram. Let’s find those on this diagram.
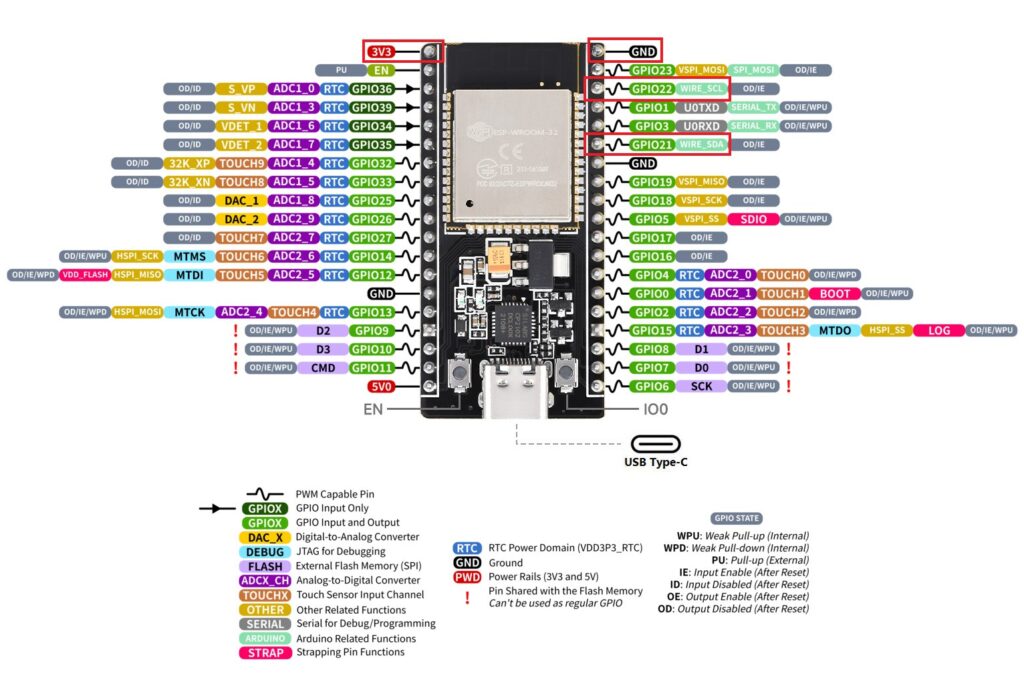
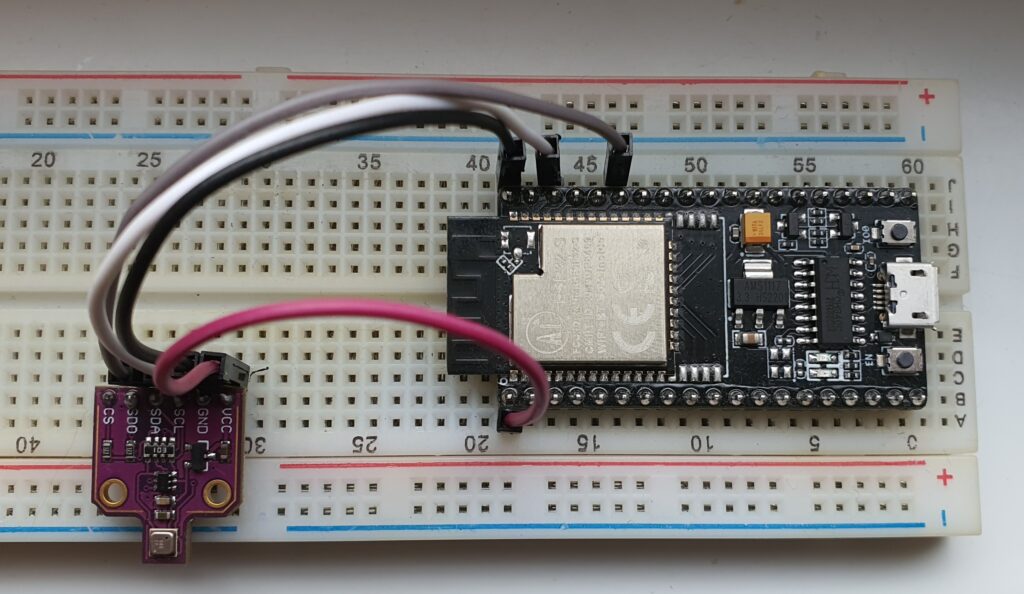
These are the 3rd and 6th pins from the top right. We need to connect the sensor to these inputs. For the BME680 to work, it also needs a power supply. We can get this from 3.3 V from the 1st pin from the top left and ground 1 pin to the right. Let’s connect them.
Configuring Arduino IDE 1
To be able to read from the sensor, we first need to configure the programming environment. So we need to install some libraries first.
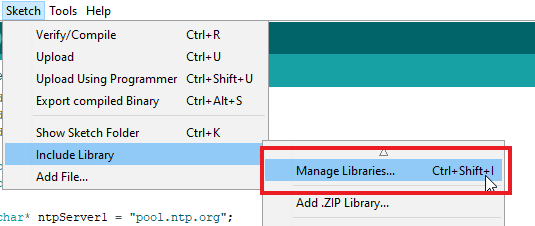
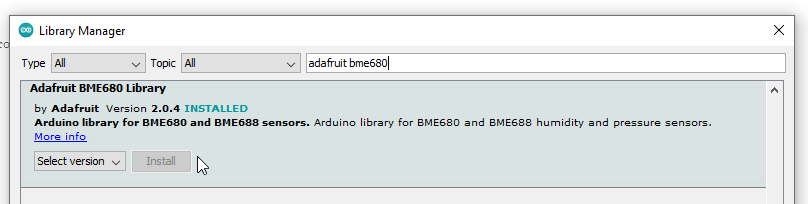
Neka da otidem na Sketch -> Include Library -> Manage Libraries
And let’s search for “adafruit bme680” there, select and install.
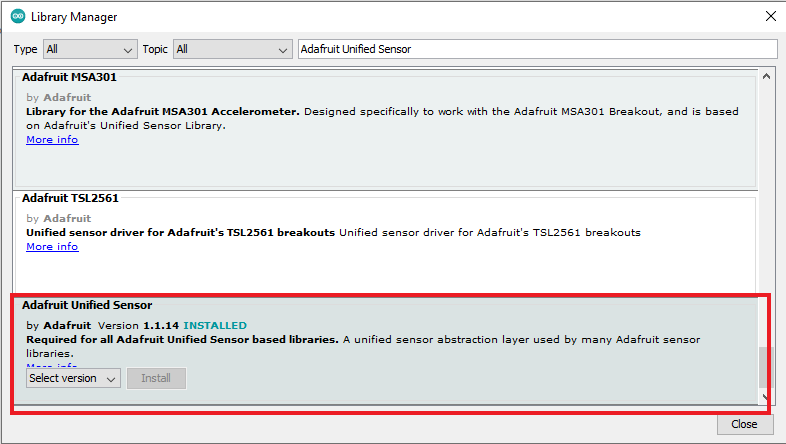
Next, we need to install the sensor libraries.
Let’s go back to Sketch -> Include Library -> Manage Libraries, search for “Adafruit Unified Sensor” and install it.
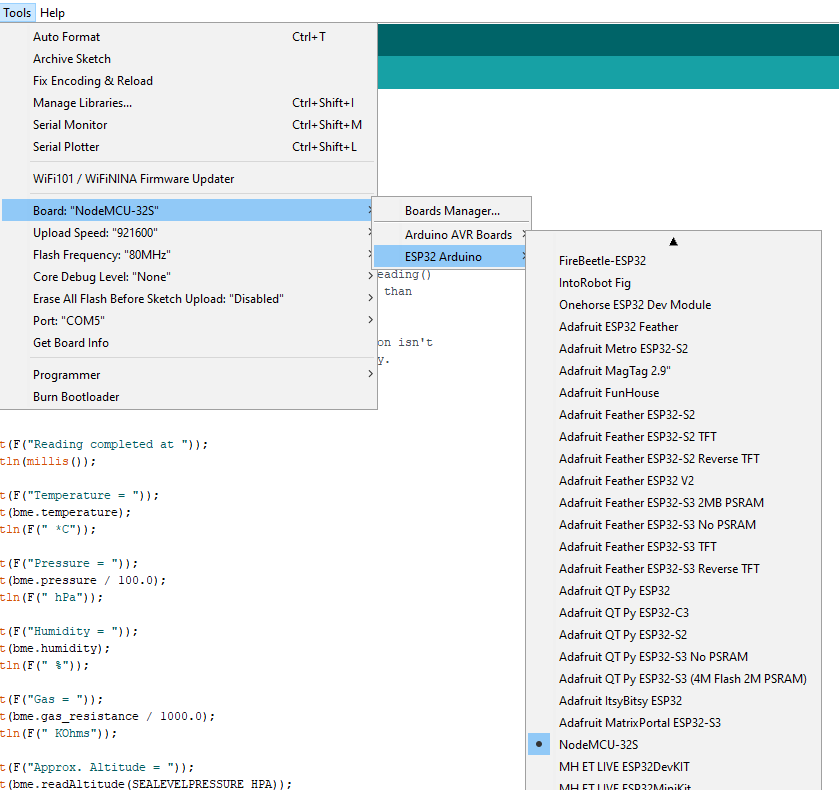
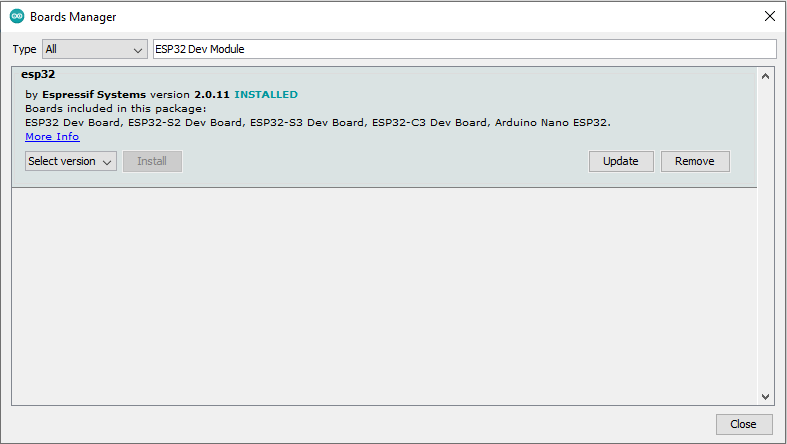
If you used this article to configure the Arduino IDE, we need to change the board because we are currently using the NodeMCU-32S. Let’s go to Tools -> Board -> Boards manager and let’s select NodeMCU-32S. To have this, we need to have previously installed esp32 from the Espressif Systems library (shown in the next screenshot).
Now we’re ready to write some code.
Code
The code we use is taken from here.
/***
  Read Our Complete Guide: https://RandomNerdTutorials.com/esp32-bme680-sensor-arduino/
  Designed specifically to work with the Adafruit BME680 Breakout ----> http://www.adafruit.com/products/3660 These sensors use I2C or SPI to communicate, 2 or 4 pins are required to interface. Adafruit invests time and resources providing this open source code, please support Adafruit and open-source hardware by purchasing products from Adafruit! Written by Limor Fried & Kevin Townsend for Adafruit Industries. BSD license, all text above must be included in any redistribution
***/

#include <Wire.h>
#include <SPI.h>
#include <Adafruit_Sensor.h>
#include "Adafruit_BME680.h"

/*#define BME_SCK 18
#define BME_MISO 19
#define BME_MOSI 23
#define BME_CS 5*/

#define SEALEVELPRESSURE_HPA (1013.25)

Adafruit_BME680 bme; // I2C
//Adafruit_BME680 bme(BME_CS); // hardware SPI
//Adafruit_BME680 bme(BME_CS, BME_MOSI, BME_MISO, BME_SCK);

void setup() {
  Serial.begin(115200);
  while (!Serial);
  Serial.println(F("BME680 async test"));

  if (!bme.begin()) {
    Serial.println(F("Could not find a valid BME680 sensor, check wiring!"));
    while (1);
  }

  // Set up oversampling and filter initialization
  bme.setTemperatureOversampling(BME680_OS_8X);
  bme.setHumidityOversampling(BME680_OS_2X);
  bme.setPressureOversampling(BME680_OS_4X);
  bme.setIIRFilterSize(BME680_FILTER_SIZE_3);
  bme.setGasHeater(320, 150); // 320*C for 150 ms
}

void loop() {
  // Tell BME680 to begin measurement.
  unsigned long endTime = bme.beginReading();
  if (endTime == 0) {
    Serial.println(F("Failed to begin reading :("));
    return;
  }
  Serial.print(F("Reading started at "));
  Serial.print(millis());
  Serial.print(F(" and will finish at "));
  Serial.println(endTime);

  Serial.println(F("You can do other work during BME680 measurement."));
  delay(50); // This represents parallel work.
  // There's no need to delay() until millis() >= endTime: bme.endReading()
  // takes care of that. It's okay for parallel work to take longer than
  // BME680's measurement time.

  // Obtain measurement results from BME680. Note that this operation isn't
  // instantaneous even if milli() >= endTime due to I2C/SPI latency.
  if (!bme.endReading()) {
    Serial.println(F("Failed to complete reading :("));
    return;
  }
  Serial.print(F("Reading completed at "));
  Serial.println(millis());

  Serial.print(F("Temperature = "));
  Serial.print(bme.temperature);
  Serial.println(F(" *C"));

  Serial.print(F("Pressure = "));
  Serial.print(bme.pressure / 100.0);
  Serial.println(F(" hPa"));

  Serial.print(F("Humidity = "));
  Serial.print(bme.humidity);
  Serial.println(F(" %"));

  Serial.print(F("Gas = "));
  Serial.print(bme.gas_resistance / 1000.0);
  Serial.println(F(" KOhms"));

  Serial.print(F("Approx. Altitude = "));
  Serial.print(bme.readAltitude(SEALEVELPRESSURE_HPA));
  Serial.println(F(" m"));

  Serial.println();
  delay(2000);
}
After we compile the code and save it to the stitch, we can open the serial console and see the following:
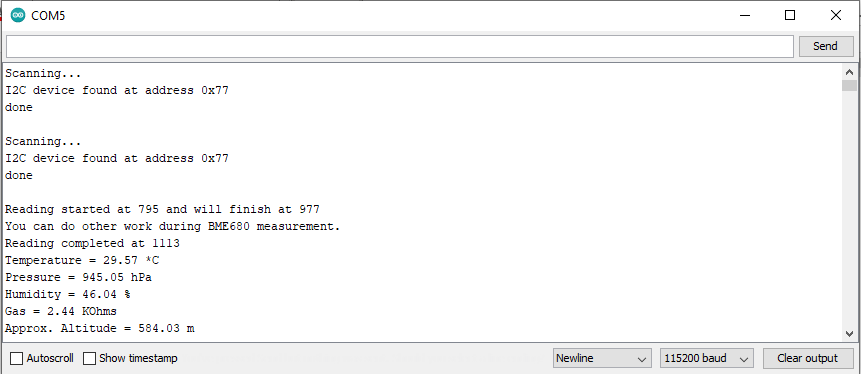
This way we can read the sensor values. You can read more details about the code in the original article from which it was taken, here. But let’s pay a little more attention to the values.
The values
As we have seen the sensor can measure temperature, altitude, humidity and gas.
The sensor measures the temperature change quite accurately, but the temperature value is not exact. If we read some of the original manufacturer’s documents, for example this here, we find the following description:
“2.7 Temperature offsets due to heat sources on the board
Let’s have a look at the temperature and humidity values we are receiving from the board. A temperature of over thirty degrees and such a low relative humidity seems off. Looking at a reference thermometer, we can see that our temperature is indeed a few degrees to high. Does that mean the temperature sensor inside the BME680 is inaccurate?
Actually no, it very accurately measures the temperature exactly where it is located on the board. But there also is the issue: our board as most devices contains some heat sources (e.g., MCU, WiFi chip, display, …). This means the temperature on our board is actually higher than the ambient temperature. Since the absolute amount of water in the air is approximately constant, this also causes the relative humidity to be lower on our board than elsewhere in the room.”
What this means for us is that we need to take a reference value with another thermometer and adjust the temperature offset relative to it. We can do this by subtracting or adding the offset to the degrees in the program. The same is true for humidity.
Gas and VOC
When we read the gas value, we get a sensor resistance value, but what does that mean and what is the VOC.
VOC stands for Volatile Organic Compounds and is used to describe a variety of chemical compounds that have high vapour permeability and evaporate readily under ordinary conditions of temperature and pressure. They are often associated with industrial processes, painting, gluing, cleaning and other activities that can cause air pollution and have harmful effects on human health and the environment.
When VOCs bind to gases, the resistance of the sensor increases, which decreases electrical conductivity, and when VOCs decrease, the resistance decreases, which increases electrical conductivity. Thus by measuring the resistivity we can detect the VOC gases. In short, when the resistivity increases and the presence of gases increases, and when it decreases and the gases decrease.
But to be able to display understandable values, we will use the bsec library.
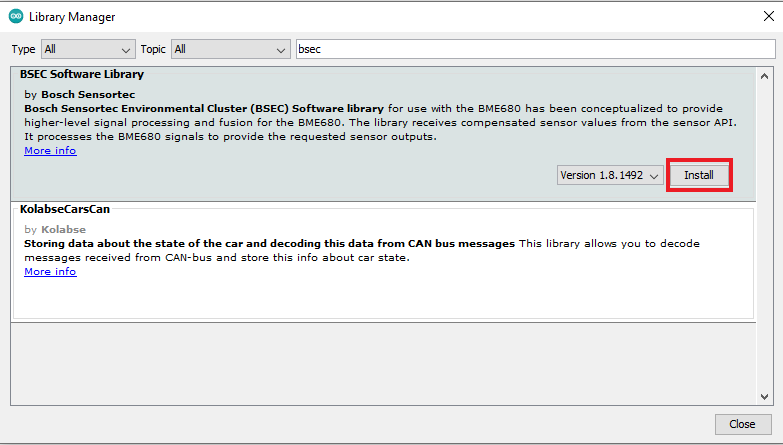
BSEC
Let’s install it. Let’s go back to Sketch -> Include Library -> Manage Libraries, search for “bsec” and install it.
Let’s copy the following code, which can be found here with more description.
#include <EEPROM.h>
#include "bsec.h"
/* Configure the BSEC library with information about the sensor
    18v/33v = Voltage at Vdd. 1.8V or 3.3V
    3s/300s = BSEC operating mode, BSEC_SAMPLE_RATE_LP or BSEC_SAMPLE_RATE_ULP
    4d/28d = Operating age of the sensor in days
    generic_18v_3s_4d
    generic_18v_3s_28d
    generic_18v_300s_4d
    generic_18v_300s_28d
    generic_33v_3s_4d
    generic_33v_3s_28d
    generic_33v_300s_4d
    generic_33v_300s_28d
*/
const uint8_t bsec_config_iaq[] = {
#include "config/generic_33v_3s_4d/bsec_iaq.txt"
};

#define BME68X_I2C_ADDR 0x77

#define STATE_SAVE_PERIOD  UINT32_C(360 * 60 * 1000) // 360 minutes - 4 times a day

// Helper functions declarations
void checkIaqSensorStatus(void);
void errLeds(void);
void loadState(void);
void updateState(void);

// Create an object of the class Bsec
Bsec iaqSensor;
uint8_t bsecState[BSEC_MAX_STATE_BLOB_SIZE] = {0};
uint16_t stateUpdateCounter = 0;

String output;

// Entry point for the example
void setup(void)
{
  EEPROM.begin(BSEC_MAX_STATE_BLOB_SIZE + 1);
  Serial.begin(115200);
  delay(1000);
  pinMode(LED_BUILTIN, OUTPUT);
  iaqSensor.begin(BME68X_I2C_ADDR, Wire);
  output = "\nBSEC library version " + String(iaqSensor.version.major) + "." + String(iaqSensor.version.minor) + "." + String(iaqSensor.version.major_bugfix) + "." + String(iaqSensor.version.minor_bugfix);
  Serial.println(output);
  checkIaqSensorStatus();

  iaqSensor.setConfig(bsec_config_iaq);
  checkIaqSensorStatus();

  loadState();

  bsec_virtual_sensor_t sensorList[13] = {
    BSEC_OUTPUT_IAQ,
    BSEC_OUTPUT_STATIC_IAQ,
    BSEC_OUTPUT_CO2_EQUIVALENT,
    BSEC_OUTPUT_BREATH_VOC_EQUIVALENT,
    BSEC_OUTPUT_RAW_TEMPERATURE,
    BSEC_OUTPUT_RAW_PRESSURE,
    BSEC_OUTPUT_RAW_HUMIDITY,
    BSEC_OUTPUT_RAW_GAS,
    BSEC_OUTPUT_STABILIZATION_STATUS,
    BSEC_OUTPUT_RUN_IN_STATUS,
    BSEC_OUTPUT_SENSOR_HEAT_COMPENSATED_TEMPERATURE,
    BSEC_OUTPUT_SENSOR_HEAT_COMPENSATED_HUMIDITY,
    BSEC_OUTPUT_GAS_PERCENTAGE
  };

  iaqSensor.updateSubscription(sensorList, 13, BSEC_SAMPLE_RATE_LP);
  checkIaqSensorStatus();

 }

// Function that is looped forever
void loop(void)
{
  unsigned long time_trigger = millis();
  if (iaqSensor.run()) { // If new data is available
    digitalWrite(LED_BUILTIN, HIGH);
    output = "Timestamp [ms]: " + String(time_trigger) + "\n";
    output += "Raw temperature [°C]: " + String(iaqSensor.rawTemperature) + "\n";
    output += "Pressure [hPa]: " + String(iaqSensor.pressure/100) + "\n";
    output += "Raw relative humidity [%]: " + String(iaqSensor.rawHumidity) + "\n";
    output += "Gas resistance [Ohm]: " + String(iaqSensor.gasResistance/1000) +"\n";
    output += "IAQ: " + String(iaqSensor.iaq) + "\n";
    output += "IAQ accuracy: " + String(iaqSensor.iaqAccuracy) + "\n";
    output += "Temperature [°C]: " + String(iaqSensor.temperature) + "\n";
    output += "Relative humidity [%]: " + String(iaqSensor.humidity) + "\n";
    output += "Static IAQ: " + String(iaqSensor.staticIaq) + "\n";
    output += "CO2 equivalent: " + String(iaqSensor.co2Equivalent) + "\n";
    output += "Breath VOC equivalent: " + String(iaqSensor.breathVocEquivalent) + "\n";
    Serial.println(output);

    digitalWrite(LED_BUILTIN, LOW);
    updateState();
  } else {
    checkIaqSensorStatus();
  }
}

// Helper function definitions
void checkIaqSensorStatus(void)
{
  if (iaqSensor.bsecStatus != BSEC_OK) {
    if (iaqSensor.bsecStatus < BSEC_OK) {
      output = "BSEC error code : " + String(iaqSensor.bsecStatus);
      Serial.println(output);
      for (;;)
        errLeds(); /* Halt in case of failure */
    } else {
      output = "BSEC warning code : " + String(iaqSensor.bsecStatus);
      Serial.println(output);
    }
  }

  if (iaqSensor.bme68xStatus != BME68X_OK) {
    if (iaqSensor.bme68xStatus < BME68X_OK) {
      output = "BME68X error code : " + String(iaqSensor.bme68xStatus);
      Serial.println(output);
      for (;;)
        errLeds(); /* Halt in case of failure */
    } else {
      output = "BME68X warning code : " + String(iaqSensor.bme68xStatus);
      Serial.println(output);
    }
  }
}

void errLeds(void)
{
  pinMode(LED_BUILTIN, OUTPUT);
  digitalWrite(LED_BUILTIN, HIGH);
  delay(100);
  digitalWrite(LED_BUILTIN, LOW);
  delay(100);
}

void loadState(void)
{
  if (EEPROM.read(0) == BSEC_MAX_STATE_BLOB_SIZE) {
    // Existing state in EEPROM
    Serial.println("Reading state from EEPROM");

    for (uint8_t i = 0; i < BSEC_MAX_STATE_BLOB_SIZE; i++) {
      bsecState[i] = EEPROM.read(i + 1);
      Serial.println(bsecState[i], HEX);
    }

    iaqSensor.setState(bsecState);
    checkIaqSensorStatus();
  } else {
    // Erase the EEPROM with zeroes
    Serial.println("Erasing EEPROM");

    for (uint8_t i = 0; i < BSEC_MAX_STATE_BLOB_SIZE + 1; i++)
      EEPROM.write(i, 0);

    EEPROM.commit();
  }
}

void updateState(void)
{
  bool update = false;
  if (stateUpdateCounter == 0) {
    /* First state update when IAQ accuracy is >= 3 */
    if (iaqSensor.iaqAccuracy >= 3) {
      update = true;
      stateUpdateCounter++;
    }
  } else {
    /* Update every STATE_SAVE_PERIOD minutes */
    if ((stateUpdateCounter * STATE_SAVE_PERIOD) < millis()) {
      update = true;
      stateUpdateCounter++;
    }
  }

  if (update) {
    iaqSensor.getState(bsecState);
    checkIaqSensorStatus();

    Serial.println("Writing state to EEPROM");

    for (uint8_t i = 0; i < BSEC_MAX_STATE_BLOB_SIZE ; i++) {
      EEPROM.write(i + 1, bsecState[i]);
      Serial.println(bsecState[i], HEX);
    }

    EEPROM.write(0, BSEC_MAX_STATE_BLOB_SIZE);
    EEPROM.commit();
  }
}
In the code we need to configure BME68X_I2C_ADDR. In this case it is 0x77. We can also adjust the BSEC library configuration. In the code it is configured with generic_33v_3s_4d. More information about the library can be found here.
When we upload the code to the board, we see the following values in the serial console
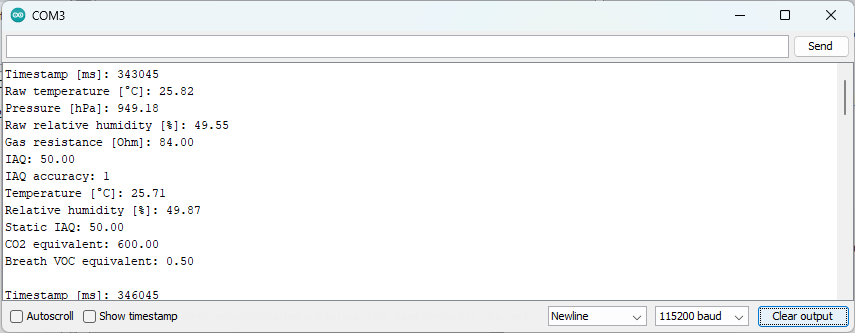
Let’s take a closer look at the values
Timestamp [ms]: 343045 – This is the time at which the measurement started
Raw temperature [°C]: 25.82 – This is the temperature read by the sensor
Pressure [hPa]: 949.18 – This is the altitude pressure read by the sensor (not at sea level, but at the actual altitude)
Raw relative humidity [%]: 49.55 – The relative humidity read by the sensor. Or it is the ratio, expressed as a percentage, of the amount of moisture available in the atmosphere, relative to the amount that would be available if the air were saturated.
Gas resistance [Ohm]: 84.00 – The resistance that is obtained when measuring the VOC.
IAQ: 50.00 – Indoor air quality or Air Quality Index
IAQ accuracy: 1 – This flag is interesting and we can get information about it here, but briefly
IAQ accuracy actually reflects the current state of the background calibration process, such as:
- IAQ Accuracy=0 can mean: the BSEC has just started and the sensor is stabilizing (this usually takes 5 min in LP mode or 20 min in ULP mode), there has been a timing violation (i.e. the BSEC was called too early or too late) which should be signaled by the BSEC via a warning/flag error.
- IAQ Accuracy=1 means that the BSEC background history is uncertain. This usually means that the gas sensor data was too stable for the BSEC to clearly determine its reference values.
- IAQ Accuracy=2 means BSEC has found new calibration data and is currently calibrating,
- IAQ Accuracy=3 means that the BSEC has calibrated successfully.
Temperature [°C]: 25.71 – Estimated air temperature
Relative humidity [%]: 49.87 – Estimated relative humidity
Static IAQ: 50.00 – Static IAQ: The main difference between IAQ and static IAQ (sIAQ) lies in the scaling factor calculated based on the sensor’s recent history. The output of sIAQ is optimized for stationary applications (e.g., indoor stationary devices), while the output of IAQ is ideal for mobile applications (e.g., handheld devices).
CO2 equivalent: 600.00 – The equivalent concentration of CO2 (CO2eq) [ppm] in the environment. It is also calculated from the output of the sIAQ and derived from VOC measurements and correlation from field studies.
Breath VOC equivalent: 0.50 – Breath VOC equivalent (bVOCeq) estimates the total concentration of VOCs [ppm] in the environment. It is calculated based on the output of the sIAQ and is derived from laboratory tests.
A fairly detailed explanation of the values and what can be done with the sensor can be found here.
Conclusion
In this article we have seen how the BMP680 sensor can be programmed and its data transmitted to an ESP32 processor board. The information gathered in this way gives us a fairly accurate picture of our home. In this way we can detect factors threatening our health, understand the comfortable temperature and humidity, keep a history of the measured data and react to these changes.
Happy coding!