Let the data be my own
In the previous articles we have seen how to display and store data from the ESP32 controller. In that article we showed them on the serial console, and in this one we saved them to the Thingspeake platform. But how to store them locally with us. There must be many solutions for that, which we might look at later. But let’s focus on one that might not be the simplest, but gives us a lot of flexibility. For this, we’ll use InfluxDB 2 and we’ll hook it up to Rasberry PI 3 model B.
But what is InfluxDB?
InfluxDB is a temporary database designed to store and process time-series data. This type of data includes information that is recorded at different time points. Examples of time-series include sensor data, measurements from infrastructure monitoring, event logs, and other similar data that is recorded over time.
Here are some of the key features of InfluxDB:
- Time Series: InfluxDB is optimized to work with time series data. This means that data is written and read with specific attention to the timestamps that identify it.
- SQL-like query language (InfluxQL): InfluxDB provides its own query language called InfluxQL, which is similar to SQL. This language is optimized for queries on time series data and has a syntax that makes it easy to work with time series.
- Flexibility and scalability: InfluxDB is designed to be flexible and easily scalable. This makes it suitable for a variety of applications where temporal data storage and analysis is needed.
- Support for Retention Policies and Continuous Queries: InfluxDB allows users to set Retention Policies and create Continuous Queries to automatically process data over time periods.
- Excellent for monitoring and IoT: Due to its features, InfluxDB is particularly suited for use in monitoring systems, measurements from IoT (Internet of Things) devices and other applications where it is important to store and analyze temporal data.
- InfluxDB Version 2: In addition to the original InfluxDB (1.x), there is also InfluxDB 2, which provides a new interface, improved query language (Flux), and other innovations.
InfluxDB is commonly used in the field of monitoring and time data management due to its specific characteristics for handling this type of information. That is why we want to use the database to record data in it. This will give us a lot of flexibility because at a later stage we will be able to visualize the data, process it, react to it and pass it on to other systems. We use the database because it also provides us with a data structure, an easy language for manipulation and an input/output interface, without much effort and complex installations. This is why we use a database, rather than, for example, a text format that is written directly to memory.
But where are we going to save this data? Raspberry Pi
We’ve already discussed data logging and the database we will use, but where can we install this database? It is possible to install it on a cloud provider like Google, AWS or Azure, but for that we need constant internet. This is possible with modern technology and fast and stable internet, but let’s store things locally. That way if something happens and we are not connected, we can still access the data and not be dependent on the internet. But what is a Raspberry Pi?
Raspberry Pi (Raspberry Pi Foundation) is a series of Single Board Computers (SBC) designed for the purpose of computer science education and to support hobbyists with programming. Raspberry Pi is known for its low cost, compact size and ability to perform a variety of software tasks.
The main features of the Raspberry Pi vary depending on the model, but include typically:
- Processor: ARM-based processor with different characteristics depending on the model.
- RAM: Different models offer different levels of RAM.
- Input/Output (I/O) ports: USB ports, HDMI output, audio output, GPIO (General Purpose Input/Output) ports and others that allow connection to various peripherals.
- MicroSD card slot: the card is used to store the operating system and data.
- Networking capabilities: Built-in Ethernet port or Wi-Fi connectivity (depending on model).
- GPIO pins: the Raspberry Pi has GPIO pins that allow connection to various sensors, actuators and other electronic components.
- Operating System (OS): the Raspberry Pi supports various operating systems, such as Raspbian (formerly called “Raspberry Pi OS”), Ubuntu, and others.
Raspberry Pi has become popular not only in the education sector, but also in hobby programming, IoT projects, media center, home server, and more. This affordable and flexible computer combines the power of software and hardware in a compact and easy-to-use package. It can be on all the time and has low power consumption. The Raspberry Pi is perfect for our project and is powerful enough to get the job done.
Let’s install some software
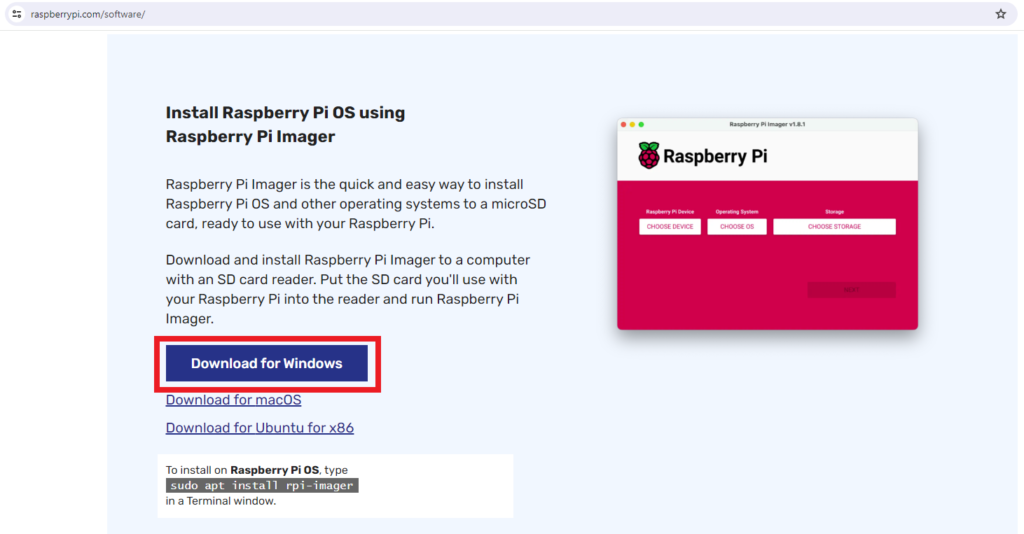
First we need to install an operating system on the Raspberry Pi board.
Go to the official Raspberry Pi page in the download section – here and download Raspberry Pi Imager by clicking on “Download for Windows” or Mac OS/Linux
Then run and install the file we downloaded.
After you run it, the following window should appear:
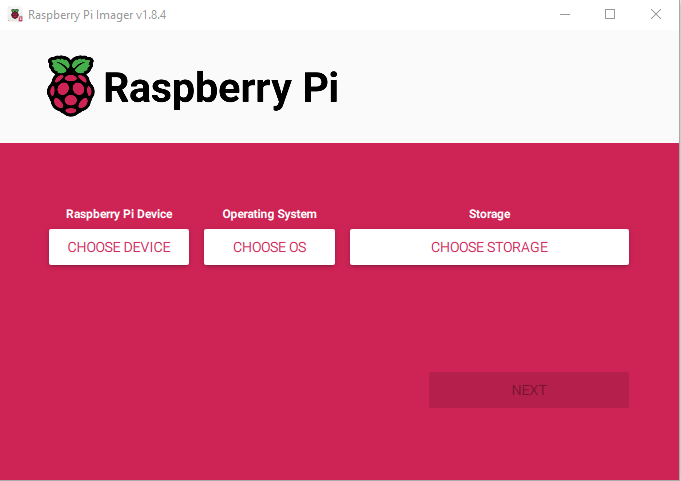
On this screen, we have to choose a few things:
- Raspberry PI Device – here we select which PI we want to install an operating system for. Here we select “Raspberry Pi 3”
- Operating OS – Here we choose Raspberry PI OS (LEGACY, 64 Bit) FULL
- Storage – Here we select the SD card that we will later insert into the Raspberry PI board and use it for memory.
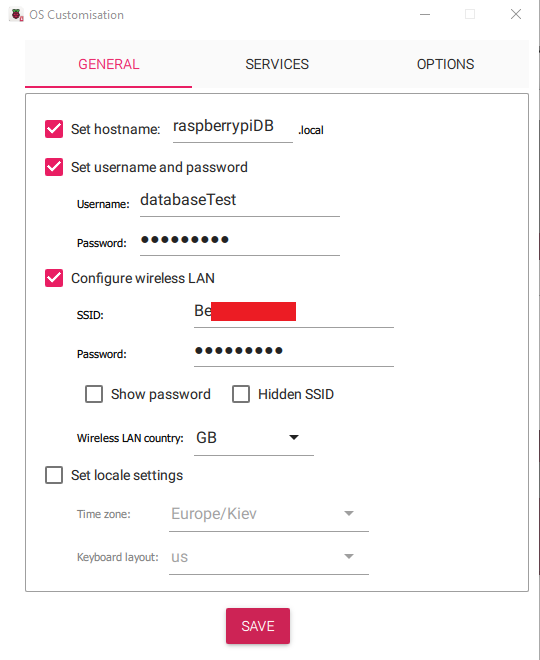
On the next screen we want to change the operating system settings. Select “Edit Settings”
Let’s set a few things up here:

Under “General”
- Set hostname – here we can set the host of the Raspberry PI board without knowing its IP address. This is especially useful when we want to run the board headless, or we don’t have a monitor, mouse and keyboard bound and the board is only bound to our local network. This way we can tether to it via ssh and manage it. But more on that later.
- Set username and password – Let’s set a username and password with which we can connect to the board. This is also the user that will be created on the operating system.
- Configure wireless LAN – Let’s also set up the connection to the wireless network if we are not using a cable. For this example, the Pi is not tethered with a cable.
Under “Services”
- Let’s enable SSH by selecting “Enable SSH” and “Use password authentication”
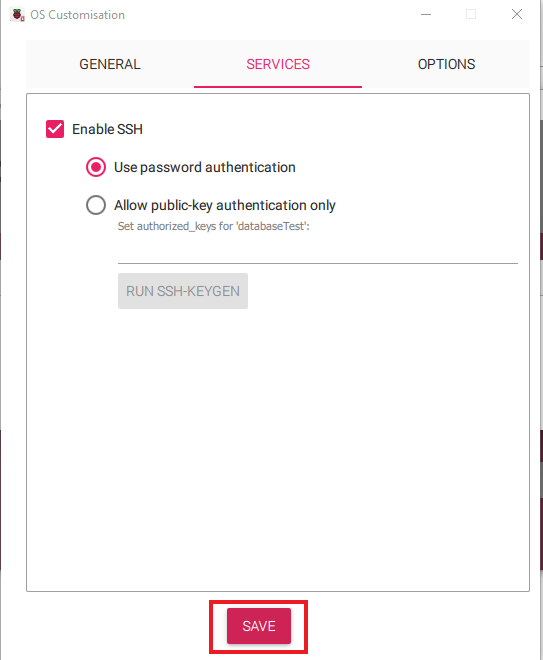
And let’s keep the settings.
Once we have made the settings, we can proceed.
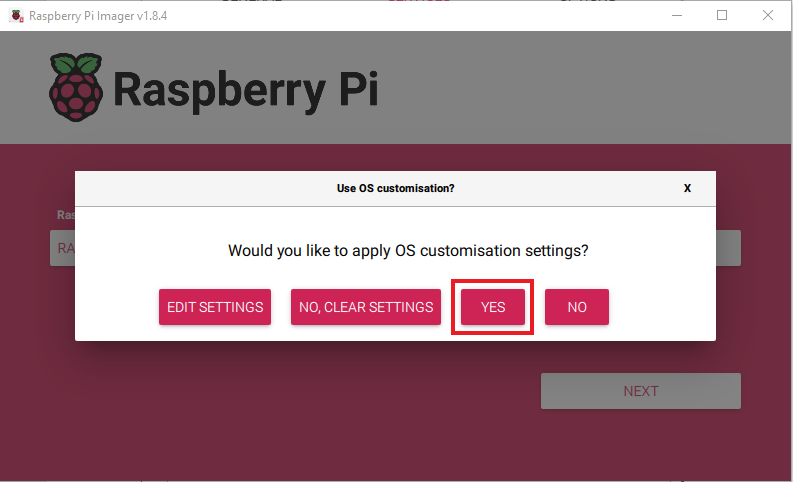
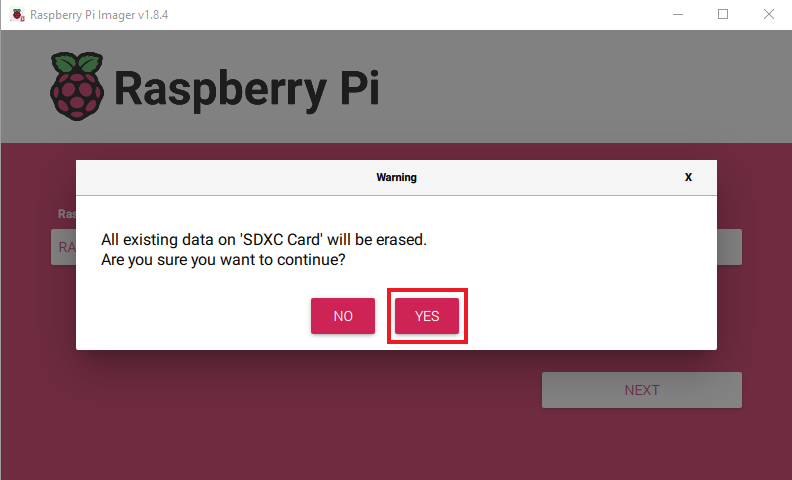
And agree that our card will be deleted
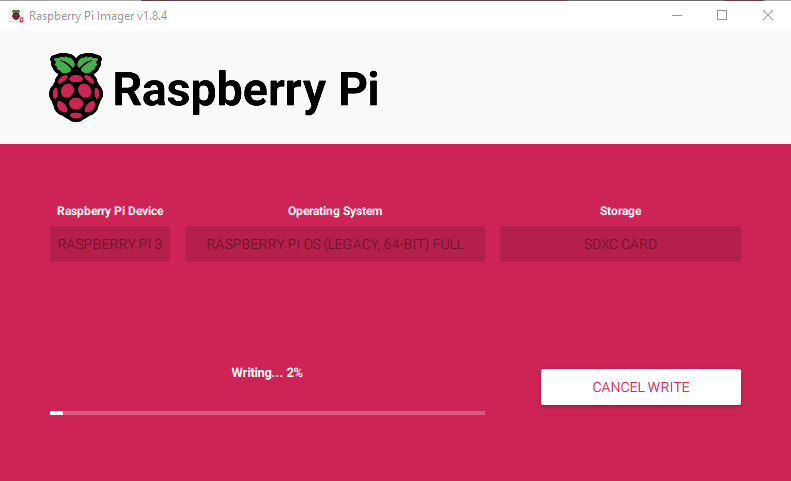
After confirming, we will get a screen showing the save status of the operating system.
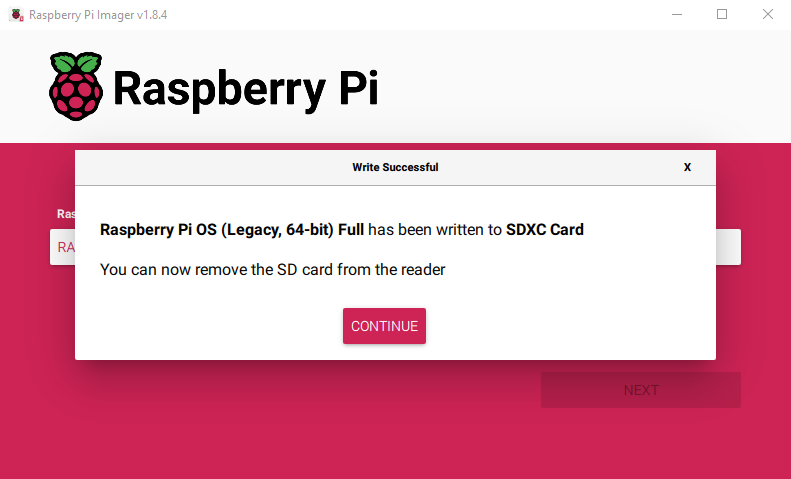
When the installation is ready we get the following message
Once we insert the card back into the Raspberry Pi board, we can connect to it. It should have automatically connected to the internet over the wireless network. We don’t need a keyboard, mouse and monitor for this. We’ll use SSH access. For this we will use putty. We can download the program from here.
What is Putty
PuTTY is free and open source software designed for terminal connectivity (SSH, Telnet, Rlogin, etc.) to other computers on the network. The project was founded by Simon Tatum and started in 1998.
The main purpose of PuTTY is to provide an easy way to connect to other computers, especially when working with servers, through different communication protocols. Here are some of the most important features of PuTTY:
- SSH, Telnet, Rlogin, etc.: Supports various protocols for secure and non-secure communication with other computers.
- Terminal Emulator: Provides a text interface that allows the user to enter commands and receive the results.
- SCP and SFTP clients: also includes tools to transfer files via SCP (Secure Copy) and SFTP (SSH File Transfer Protocol).
- Supports certificates and keys: allows the use of SSH keys for authentication, which increases security when connecting to servers.
- Support for different operating systems: puTTY is available for Microsoft Windows and there are also different ports for UNIX-based systems.
- Session Storage: allows users to store settings and configurations for frequently used sessions.
- Fast and lightweight: PuTTY is lightweight and runs fast, making it convenient to use even on older computers or with poor network connectivity.
PuTTY is a widely used tool in system administration and software development where a terminal emulator is required to access and manage remote systems. We will use it to access the system without needing to be near it.
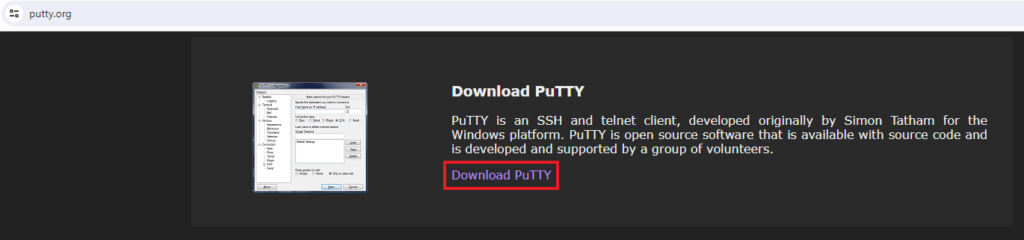
On the page, we need to click “Download PuTTY” and download “putty-64bit-0.80-installer.msi“. The file will install the program on our computer.
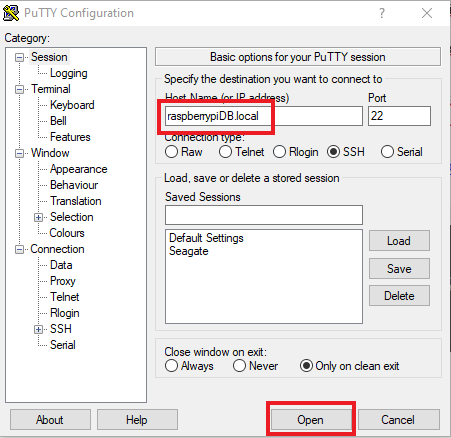
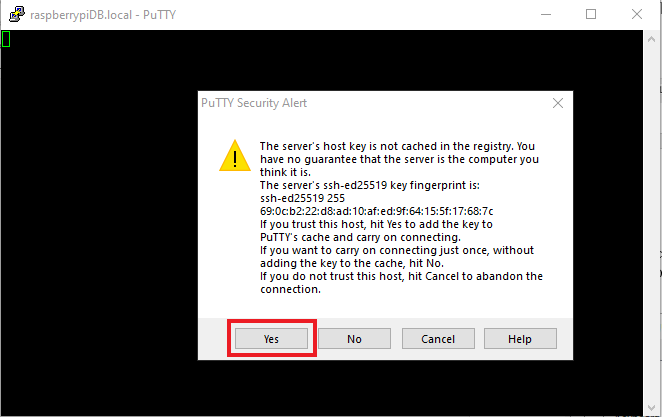
After installing it, we need to enter the address of the Raspberry Pi board in the “Host name” field and click “Open”. We have previously set the address above and then we need to accept the certificate.
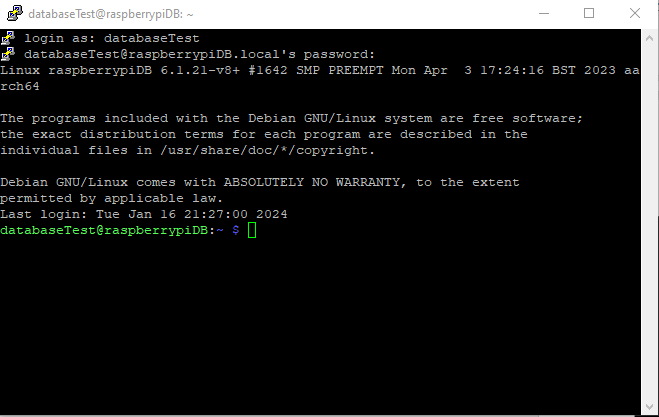
After entering the correct username and password, we can proceed with the installation.
This is what a proper log-in looks like:
We may not be able to open the address directly. To be able to log into the Pi board, we need to find its IP address somehow. One possibility is to look in the router on our network under the DHCP settings (if configured) and there see which device took an IP address last and use that address for connection. The other option is if we have physical access to the Pi board and a keyboard and monitor tied up, we can log into the OS and run the command – “hostname -I”. After executing it, we can see the address:

In this case, it is 192.168.11.42 and we can use it by replacing it with rasberrypiDB.local
Installation of InfluxDB
We now have access to the Pi board and can proceed with the database installation.
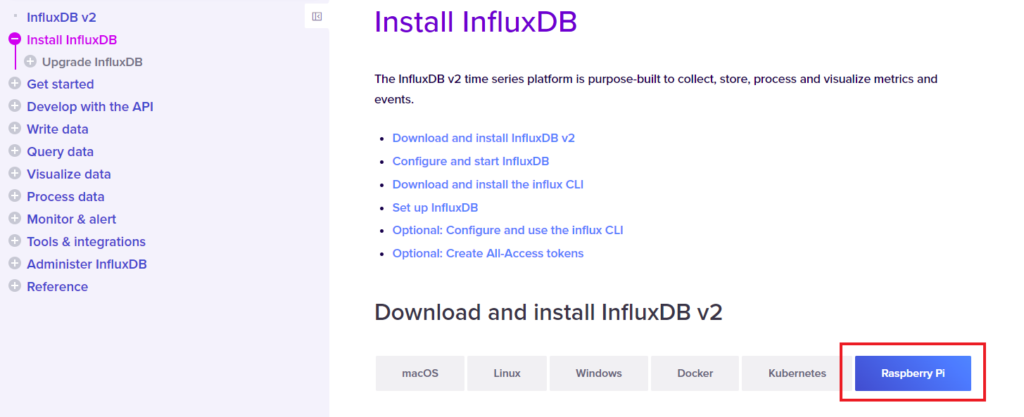
To install it, we can follow the documentation here , selecting the platform
But let’s download the database first. Run the following command in the Putty terminal
>curl -O https://dl.influxdata.com/influxdb/releases/influxdb2_2.7.4-1_arm64.deb
And let’s unzip it
>sudo dpkg -i influxdb2_2.7.4-1_arm64.deb
Now we can start the base with
> sudo service influxdb start
And to test it with
>sudo service influxdb status
Let’s see the result
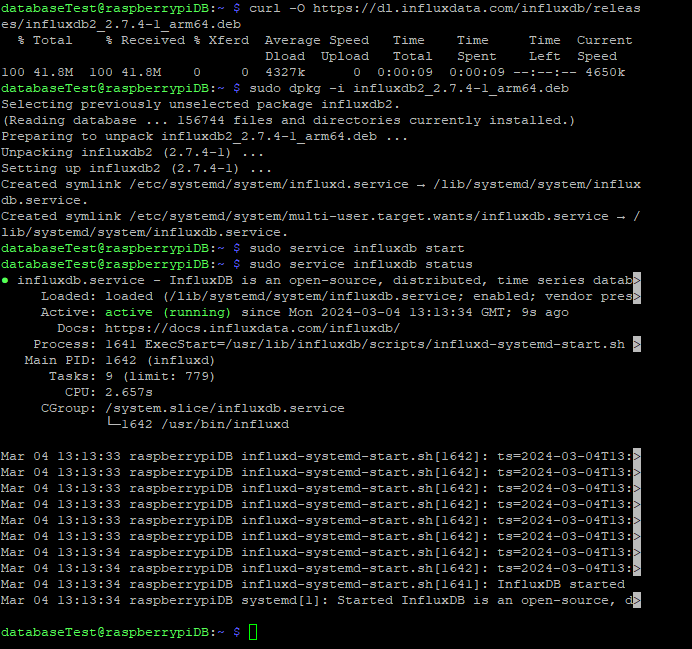
We can see that it works from the following text:
influxdb.service - InfluxDB is an open-source, distributed, time series database
Loaded: loaded (/lib/systemd/system/influxdb.service; enabled; vendor preset: enable>
Active: active (running)
Let’s open the Pi board address on port 8086 in the browser. And we’ll see this:
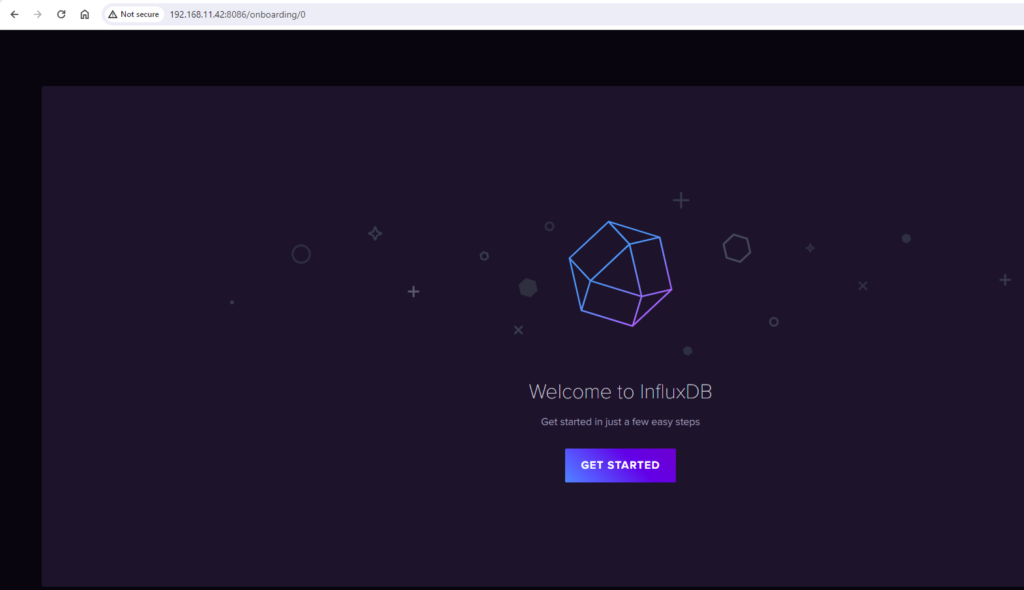
Let’s enter the same user and password we used when configuring the Pi board and move on;

We also need to enter an organization and a name for the bucket not shown above to move on. Then we get an administration token, which is nice to write down somewhere because it only shows up once. But for this example, we don’t need that extra data.
When we re-open http://192.168.11.42:8086/ we can see the home page of the database. On it we can find an example for ArduinoIDE and an example with ESP32.
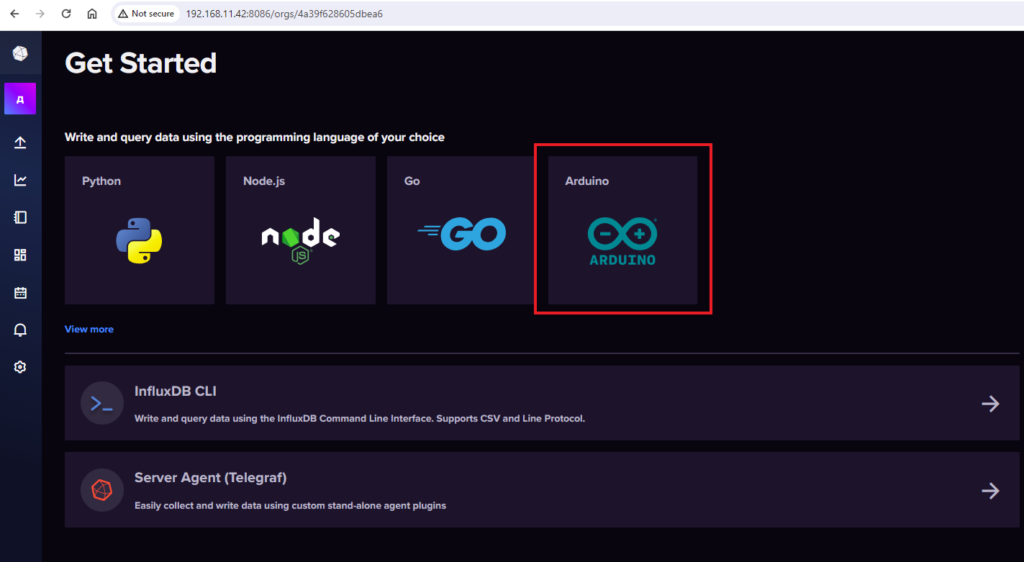
To get information about ESP32, we need to select the correct board on the page
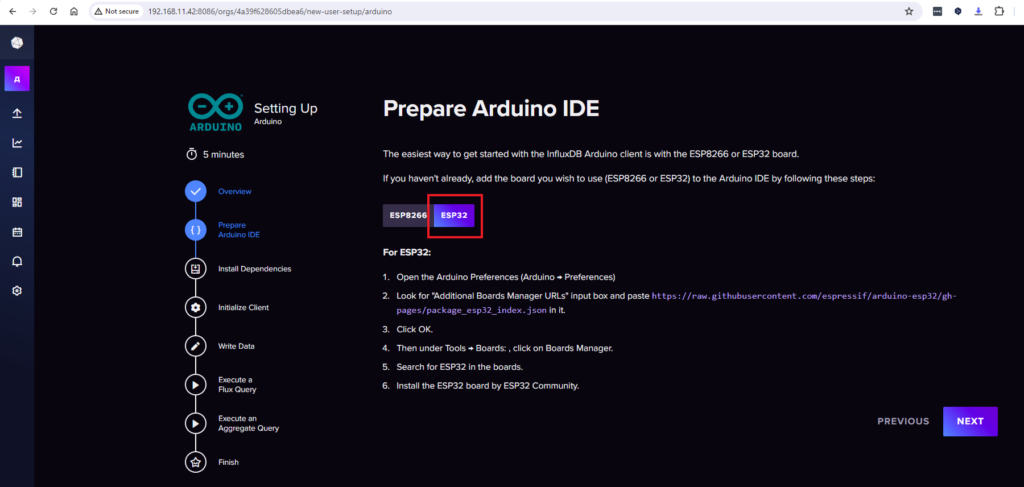
Complete the setup process described in the instructions.
In the variable INFLUXDB_BUCKET we need to fill the bucket from above, which is not shown in the screenshot.
Once we open the Arduino IDE, we need to create a new project and select the correct settings.
The program in the unit looks like this:
#if defined(ESP32)

  #include <WiFiMulti.h>

  WiFiMulti wifiMulti;

  #define DEVICE "ESP32"

  #elif defined(ESP8266)

  #include <ESP8266WiFiMulti.h>

  ESP8266WiFiMulti wifiMulti;

  #define DEVICE "ESP8266"

  #endif

  #include <InfluxDbClient.h>

  #include <InfluxDbCloud.h>

  #include "driver/temp_sensor.h"

  // WiFi AP SSID

  #define WIFI_SSID "Be*****"

  // WiFi password

  #define WIFI_PASSWORD "*****"

  #define INFLUXDB_URL "http://192.168.11.42:8086"

  #define INFLUXDB_TOKEN "PAq*****"

  #define INFLUXDB_ORG "4a3*****"

  #define INFLUXDB_BUCKET "Test"

  // Time zone info

  #define TZ_INFO "UTC2"

  // Declare InfluxDB client instance with preconfigured InfluxCloud certificate

  InfluxDBClient client(INFLUXDB_URL, INFLUXDB_ORG, INFLUXDB_BUCKET, INFLUXDB_TOKEN, InfluxDbCloud2CACert);

  // Declare Data point

  Point sensor("Internal temp");

  void initTempSensor(){

      temp_sensor_config_t temp_sensor = TSENS_CONFIG_DEFAULT();

      temp_sensor.dac_offset = TSENS_DAC_L2;

      temp_sensor_set_config(temp_sensor);

      temp_sensor_start();

  }

  void setup() {

    Serial.begin(115200);

    initTempSensor();

    // Setup wifi

    WiFi.mode(WIFI_STA);

    wifiMulti.addAP(WIFI_SSID, WIFI_PASSWORD);

    Serial.print("Connecting to wifi");

    while (wifiMulti.run() != WL_CONNECTED) {

      Serial.print(".");

      delay(100);

    }

    Serial.println();

    // Accurate time is necessary for certificate validation and writing in batches

    // We use the NTP servers in your area as provided by: https://www.pool.ntp.org/zone/

    // Syncing progress and the time will be printed to Serial.

    timeSync(TZ_INFO, "pool.ntp.org", "time.nis.gov");

    // Check server connection

    if (client.validateConnection()) {

      Serial.print("Connected to InfluxDB: ");

      Serial.println(client.getServerUrl());

    } else {

      Serial.print("InfluxDB connection failed: ");

      Serial.println(client.getLastErrorMessage());

    }

     // Add tags to the data point

    sensor.addTag("device", DEVICE);

    sensor.addTag("Name", "My_ESP32_board");

  }

  void loop() {

   float result = 0;

    temp_sensor_read_celsius(&result);

    Serial.print("Temperature:");

    Serial.println(result);

    // Clear fields for reusing the point. Tags will remain the same as set above.

    sensor.clearFields();

    // Store measured value into point

    sensor.addField("temp", result);

    // Print what are we exactly writing

    Serial.print("Writing: ");

    Serial.println(sensor.toLineProtocol());

    // Check WiFi connection and reconnect if needed

    if (wifiMulti.run() != WL_CONNECTED) {

      Serial.println("Wifi connection lost");

    }

    // Write point

    if (!client.writePoint(sensor)) {

      Serial.print("InfluxDB write failed: ");

      Serial.println(client.getLastErrorMessage());

    }

    Serial.println("Waiting 1 second");

    delay(1000);

  }
We need to enter the correct WiFi network settings and tokens from the example database. The program is modified to read from the internal temperature sensor and write the results to the database. How to read the internal sensor can be found here.
Let’s test it and see the results. In the serial console we can see that the ESP32 board writes the results.
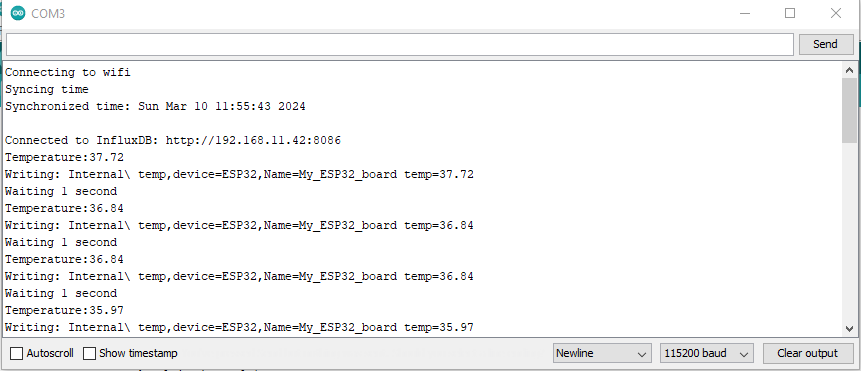
On initial attempts to write, the following error appeared: ‘InfluxDB write failed: connection refused’. Here you can find an easy solution to the problem.
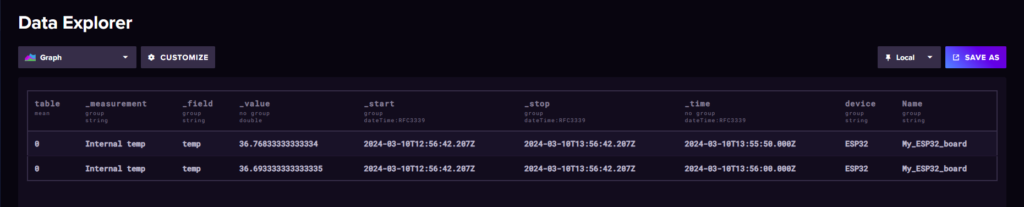
Let’s see the records in the Influx database:
Conclusion
With this example, we have seen how we can write measurements from a sensor on an ESP32 board to an external database. This makes it easier for us when we want to work with the data, it also protects it from loss and structures it so it can be used by other applications. We also have a history of the data and are not dependent on the memory and network connection of the sensors. This is the last article in a series about working with sensor data on an ESP32 board. You can see here how it is visualized in the serial console, and here how it is stored in the external ThingSpeak platform.
Happy codding!