Introduction
So far in this article, we’ve seen how sensor data can be displayed onboard the serial console. But this is not particularly convenient or useful for most applications. It would be much more useful if we recorded these values on an external platform that we always have access to, can process the data, and can visualize. One such platform is ThingSpeak. But what is it?
ThingSpeak – IoT Platform
ThingSpeak is an online platform for Internet of Things (IoT) data storage, analysis and visualization. This service provides powerful capabilities to collect and process data from various IoT devices such as sensors, microcontrollers, and more.
One of the key benefits of ThingSpeak is its easy integration with various IoT devices and platforms. Users can send measured values to ThingSpeak using HTTP or MQTT protocols. This makes the platform accessible to a wide range of devices and applications.
ThingSpeak’s core functionality includes the ability to store data, visualize data in real-time, and build graphs for analysis. Users can configure graphs and charts depending on certain conditions. The platform also offers free integration with MATLAB from MathWorks, with no license required. This aspect makes ThingSpeak a suitable solution for monitoring, managing IoT devices and analyzing the values collected from them.
The platform also provides options to send notifications and automated actions that are triggered when certain conditions are met. This can be useful for responding to events in real time and for managing systems.
From a security perspective, ThingSpeak has access control and data protection capabilities. Users can set access rights and use data encryption, which provides a high level of security in the processing and storage of information.
The basic idea that the platform follows is:
- Collect data from multiple possible sources (sensors, sensors, system status or external events)
- Data analysis using mathematical analyses and algorithms
- Reaction to certain results that are a consequence of the analysis
But how much does the platform cost? In its page we can find the answer:
As a commercial user we can register once for a limited time and free use during that time to check out the platform’s capabilities. All other commercial uses require a standard commercial license. Non-commercial users can use ThingSpeak for free subject to certain restrictions. Users with free usage will be limited to sending no more than 3 million messages per year (towards 8200 messages per day) to the platform and 4 channels. The message update interval remains limited to 15 seconds. A message is defined as a record with up to 8 data fields per channel. For example, a channel representing a weather station may include the following 8 data fields: temperature, humidity, barometric pressure, wind speed, wind direction, precipitation, battery level, and light level. Each message cannot exceed 3000 bytes. Also as an example of the messages we can have:
- Write to the channel using the REST API or ThingSpeak’s purpose-specific libraries
- Recording to the channel via MQTT
- Write to the ThingSpeak channel from MATLAB using thingspeakwrite or the REST API
- Write to the channel in from ThingSpeak to ThingSpeak using the MATLAB Analysis or MATLAB Visualizations applications
- All ThingSpeak entries triggered by React or Timecontrol
- Recording in an image channel in ThingSpeak. Each successful recording in an image channel consumes 100 messages
More detailed information can be found on their page.
Some practical examples
This makes ThingSpeak an ideal platform to use for a small IoT project in the home. But let’s try to implement some code and use some of the platform’s advantages. This will give us a better idea of how it is used and what it can do.
From the menu on Arduino IDE 1.8.x select File->Examples->WiFi->WiFiClient
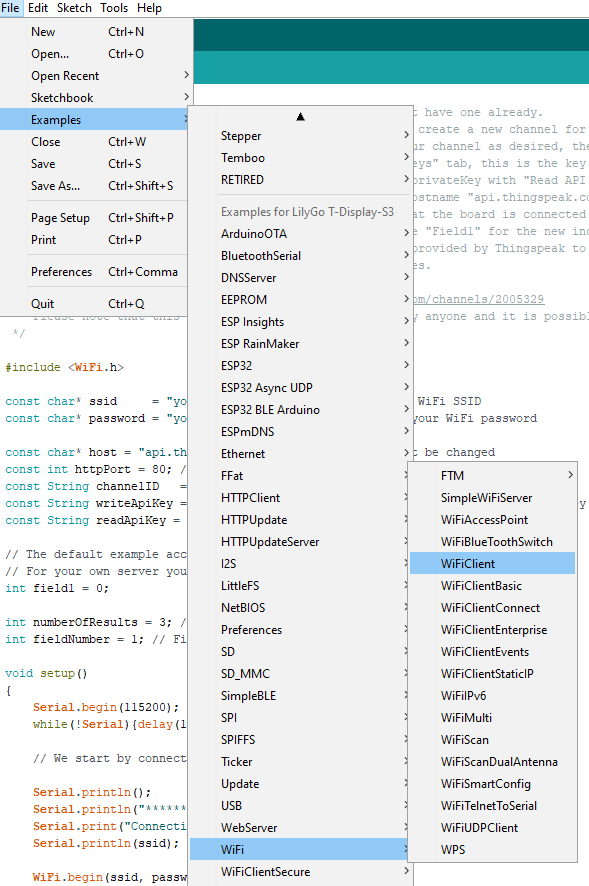
Fortunately for us, sending data to ThingSpeak is already built into this example. To use it, we need to do a few things in advance.
- You must register or log in to the page
- We need to create a channel. This is done by:
Go to My Channels

And when we are there create a channel by clicking on “New Channel”
On the next menu we can fill in several values
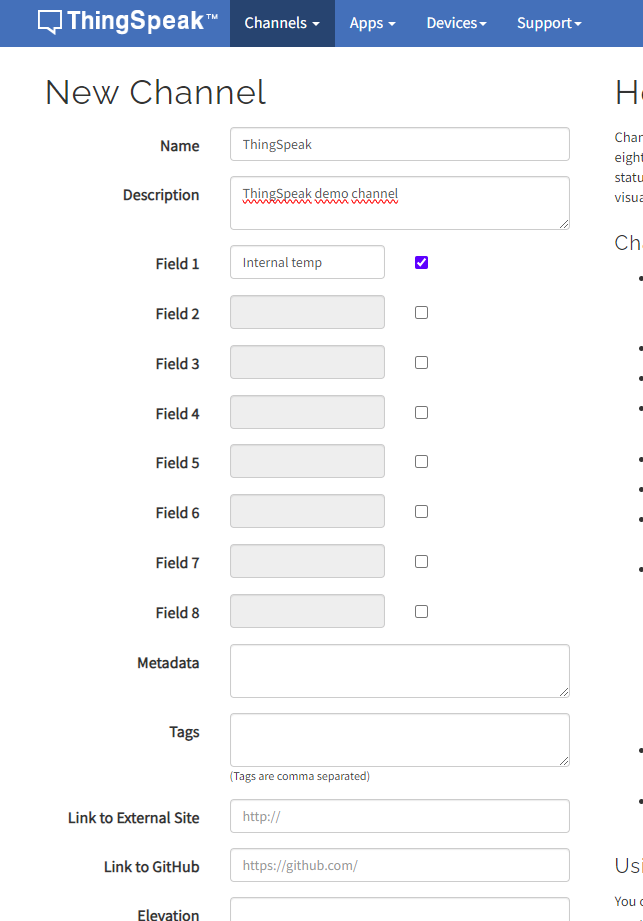
And click “Save Channel”
Now let’s fill in a few values in the code.
- Enter your WiFi network name and password. These are replaced in the ssid and password fields in place of “your-ssid” and “your-password”.
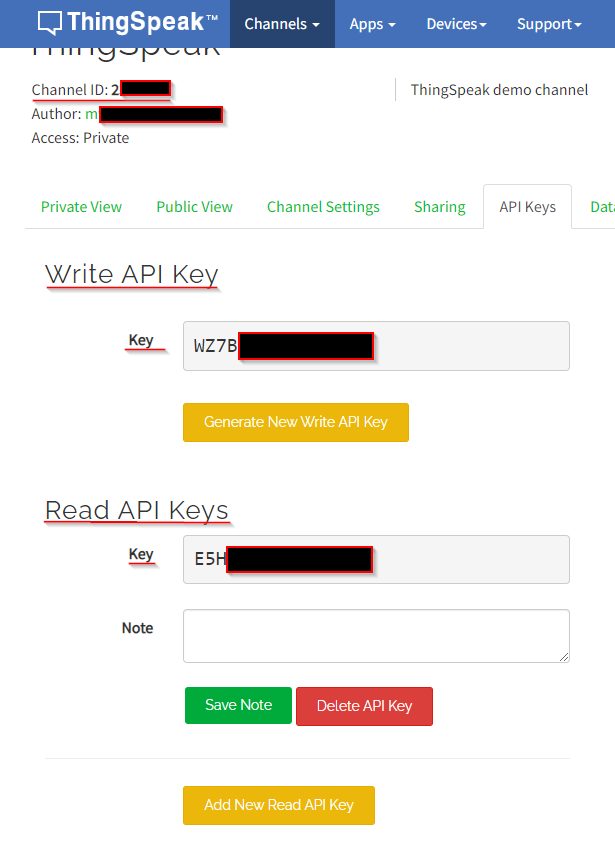
- Once we are done with that, let’s substitute the channelID, writeApiKey and readApiKey values. We can find these keys in ThingSpeak
- Let’s change the code as follows:
#include
#include "driver/temp_sensor.h"
const char* ssid     = "An****"; // Change this to your WiFi SSID
const char* password = "******"; // Change this to your WiFi password
const char* host = "api.thingspeak.com"; // This should not be changed
const int httpPort = 80; // This should not be changed
const String channelID   = "23*****"; // Change this to your channel ID
const String writeApiKey = "WZ**********"; // Change this to your Write API key
const String readApiKey = "E5**********"; // Change this to your Read API key
int numberOfResults = 3; // Number of results to be read
int fieldNumber = 1; // Field number which will be read out
void initTempSensor(){
    temp_sensor_config_t temp_sensor = TSENS_CONFIG_DEFAULT();
    temp_sensor.dac_offset = TSENS_DAC_L2;
    temp_sensor_set_config(temp_sensor);
    temp_sensor_start();
}
void setup()
{
    Serial.begin(115200);
    initTempSensor();
    while(!Serial){delay(100);}
    // We start by connecting to a WiFi network
    Serial.println();
    Serial.println("******************************************************");
    Serial.print("Connecting to ");
    Serial.println(ssid);
    WiFi.begin(ssid, password);
    while (WiFi.status() != WL_CONNECTED) {
        delay(500);
        Serial.print(".");
    }
    Serial.println("");
    Serial.println("WiFi connected");
    Serial.println("IP address: ");
    Serial.println(WiFi.localIP());
}
void readResponse(WiFiClient *client){
  unsigned long timeout = millis();
  while(client->available() == 0){
    if(millis() - timeout > 5000){
      Serial.println(">>> Client Timeout !");
      client->stop();
      return;
    }
  }
  // Read all the lines of the reply from server and print them to Serial
  while(client->available()) {
    String line = client->readStringUntil('\r');
    Serial.print(line);
  }
  Serial.printf("\nClosing connection\n\n");
}
void loop(){
  WiFiClient client;
 String footer = String(" HTTP/1.1\r\n") + "Host: " + String(host) + "\r\n" + "Connection: close\r\n\r\n";
  // WRITE --------------------------------------------------------------------------------------------
  if (!client.connect(host, httpPort)) {
    return;
  }
  float result = 0;
  temp_sensor_read_celsius(&result);
  client.print("GET /update?api_key=" + writeApiKey + "&field1=" + result + footer);
  readResponse(&client);
  // READ --------------------------------------------------------------------------------------------
  String readRequest = "GET /channels/" + channelID + "/fields/" + fieldNumber + ".json?api_key=" + writeApiKey + "&results=" + numberOfResults + " HTTP/1.1\r\n" +
                       "Host: " + host + "\r\n" +
                       "Connection: close\r\n\r\n";
  if (!client.connect(host, httpPort)) {
    return;
  }
  client.print(readRequest);
  readResponse(&client);
  // -------------------------------------------------------------------------------------------------
  delay(10000);
}
To the code from the example, I added the code from the this article. The goal of the program is that, in addition to writing values to ThingSpeak, these values should not be indiscriminate numbers, but should make some sense. This is how we write the temperature of the board itself into the platform. But let’s look at what will be written to the serial console:
******************************************************
Connecting to A********
.................................................................................................................................
WiFi connected
IP address:
192.168.25.226
HTTP/1.1 200 OK
Date: Thu, 30 Nov 2023 20:40:50 GMT
Content-Type: text/plain; charset=utf-8
Content-Length: 2
Connection: close
Status: 200 OK
Cache-Control: max-age=0, private, must-revalidate
Access-Control-Allow-Origin: *
Access-Control-Max-Age: 1800
X-Request-Id: add4611d-0b16-4645-be57-bc5f64e1fa54
Access-Control-Allow-Headers: origin, content-type, X-Requested-With
Access-Control-Allow-Methods: GET, POST, PUT, OPTIONS, DELETE, PATCH
ETag: W/"98a3ab7c340e8a033e7b37b6ef942875"
X-Frame-Options: SAMEORIGIN
79
Closing connection

HTTP/1.1 200 OK
Date: Thu, 30 Nov 2023 20:40:52 GMT
Content-Type: application/json; charset=utf-8
Transfer-Encoding: chunked
Connection: close
Status: 200 OK
Cache-Control: max-age=7, private
Access-Control-Allow-Origin: *
Access-Control-Max-Age: 1800
X-Request-Id: a9c8c4ab-ea9d-47dc-acab-80e68e24053b
Access-Control-Allow-Headers: origin, content-type, X-Requested-With
Access-Control-Allow-Methods: GET, POST, PUT, OPTIONS, DELETE, PATCH
ETag: W/"06693d374f4a0be260f2834b6fe7be04"
X-Frame-Options: SAMEORIGIN
1c6

{"channel":{"id":2******,"name":"ThingSpeak","description":"ThingSpeak demo channel","latitude":"0.0","longitude":"0.0","field1":"Internal temp","created_at":"2023-11-18T14:20:41Z","updated_at":"2023-11-18T14:20:41Z","last_entry_id":79},"feeds":[{"created_at":"2023-11-28T20:47:03Z","entry_id":77,"field1":"40.35"},{"created_at":"2023-11-28T20:47:29Z","entry_id":78,"field1":"39.04"},{"created_at":"2023-11-30T20:40:50Z","entry_id":79,"field1":"37.72"}]}
0
Closing connection
We can see that the measurements are sent and the platform returns the last 2 results.
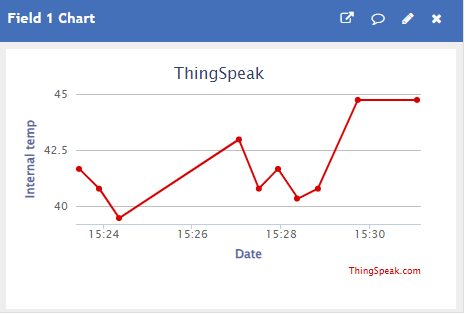
But let’s look at what’s happening in the platform channel.
On the page we can see the following graph:

Here we see the graph of the last 10 results.
How about sending an Email?
But let’s make the example a little more practical. Let’s imagine that we have to monitor the temperature and react when it gets high, for example to switch off the board. This is one of the standard features of the platform. It can notify us via email when something happens to the values. Say the temperature reaches 40 degrees. Let’s see how this works.
Log on to the ThingSpeak page. To move forward we need the API code for sending messages. We can find it by going to the profile icon and clicking on “My profile.

It starts with TAK. Copy it because we will need it to send an email.
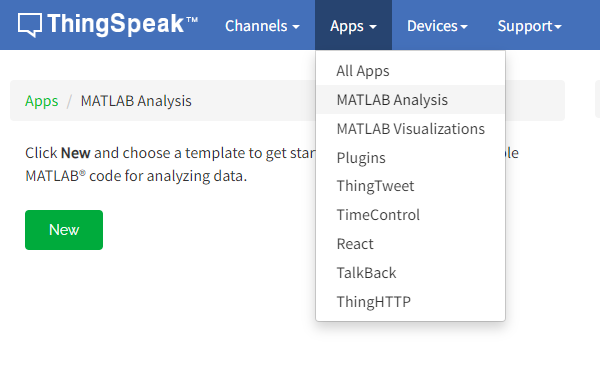
Then go to Apps -> MATLAB Analysis. There, click the “New” button. For the next step we will need the API Key from above.
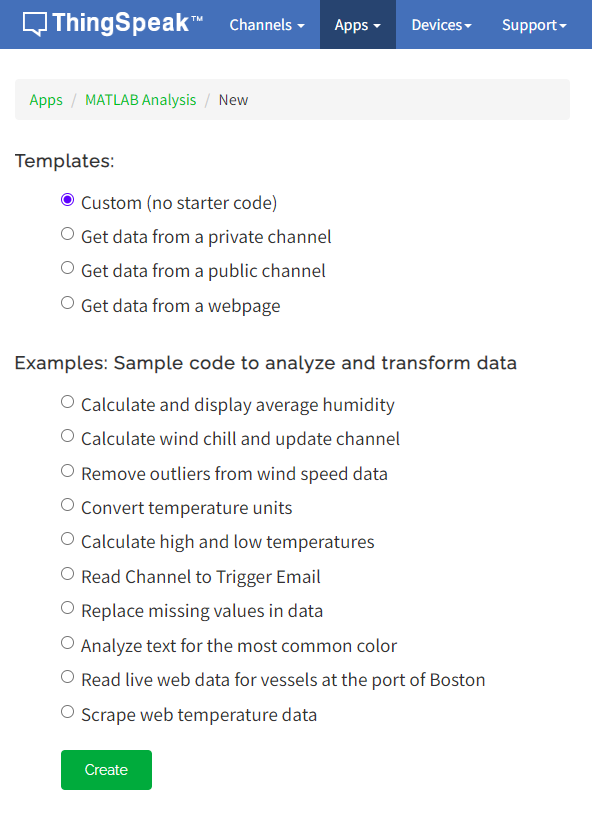
Here select “Custom (no starter code)” and click “Create”.
In the MATLAB Code field, we need to fill in the following code and replace “alert_api_key ” with the key from above:
alert_body = 'This is the text that will be emailed';
alert_subject = 'This will be the subject of the email';
alert_api_key = 'TAK**************';
alert_url= "https://api.thingspeak.com/alerts/send";
jsonmessage = sprintf(['{"subject": "%s", "body": "%s"}'], alert_subject,alert_body);
options = weboptions("HeaderFields", {'Thingspeak-Alerts-API-Key', alert_api_key; 'Content-Type','application/json'});
result = webwrite(alert_url, jsonmessage, options);
ето така:
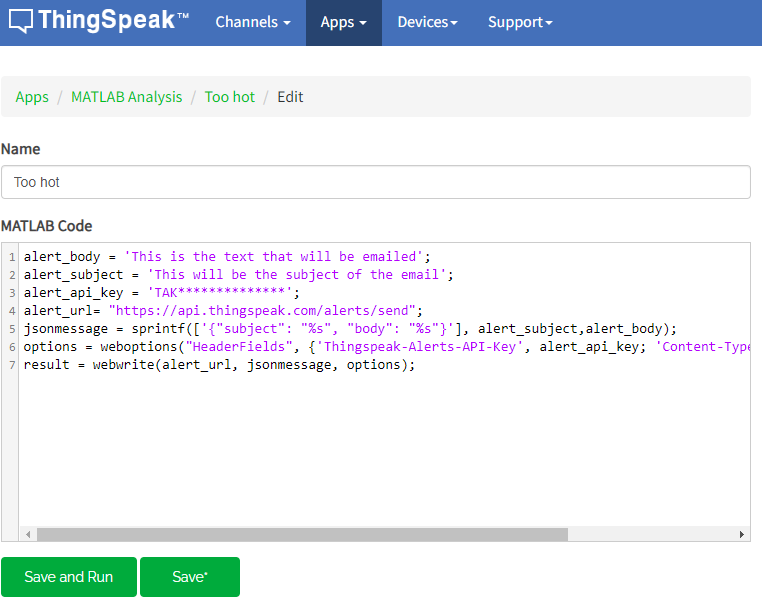
And press Save.
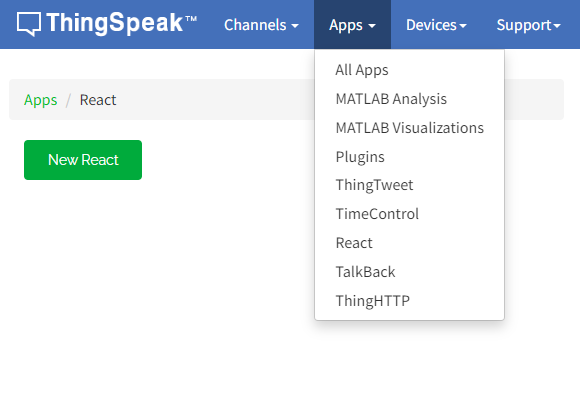
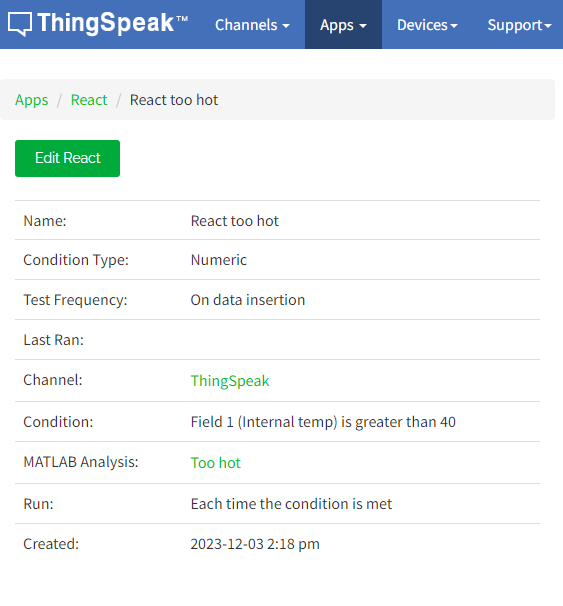
Now let’s create React
And set it up like this
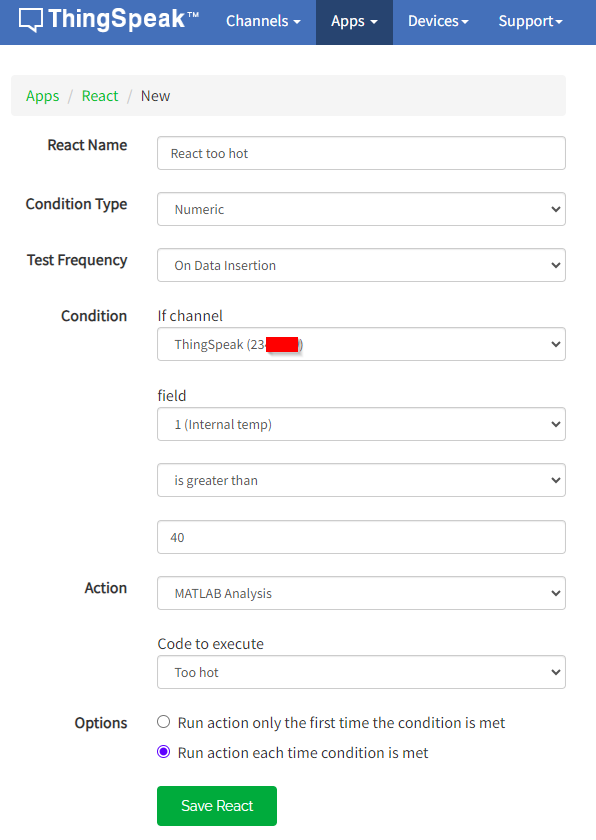
As a result we will get the following two things
Now let’s run the board and see the result.
When the temperature exceeds 40 degrees, the following Email is received:
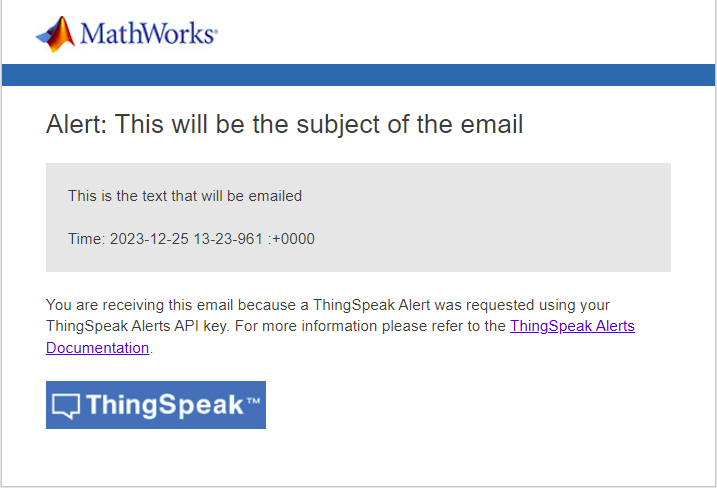
In the email are the templated values, which can be replaced with tex to more accurately describe the alarm and its meaning. They are left that way here to get a clearer picture of which text is displayed where.
Резултатите в таблицата изглеждат така:
Here it is clearly seen that the values exceeded the 40 degree limit many times over.
Brief conclusion
As you can see, the ThingSpeak platform is a powerful IoT tool. It can store information, process it, and react to certain values or outcomes. It can help us in automating various things. It can also visualize and monitor different values like temperature, pressure, humidity or power consumption. The platform offers free usage and powerful automation tools. I think today we have been introduced to another small part of home automation.
Happy codding!